This guide will show you how to securely connect Coalesce Quality to your Snowflake instance.
We need this information so we collect metadata about your tables.To be able to finish this guide, you’ll need the following:
→ Access to modify your Snowflake configuration as account admin⏱️ Estimated time to finish: 10 minutes.
→ Access to modify your Snowflake configuration as account admin⏱️ Estimated time to finish: 10 minutes.
Data we collect
We read metadata from your Snowflake account using the dedicated role described below. Depending on which features you enable in the integration, we ingest:- Catalog — databases, schemas, tables, views, materialized views, dynamic tables, semantic views, streams, stages, comments, column types, tags.
- SQL definitions —
GET_DDLoutput for tables, views, materialized views, dynamic tables, semantic views, streams, stored procedures, and user-defined functions. Used for lineage and to detect references between objects. - Constraints — primary keys (via
SHOW PRIMARY KEYS) and clustering keys. Foreign keys, uniques, and checks are read fromGET_DDLwhen present. - Table metrics (opt-in) — row counts and last-modified timestamps for anomaly detection.
- Query logs (opt-in) —
SNOWFLAKE.ACCOUNT_USAGE.QUERY_HISTORYfor performance, cost, and lineage signals. - Tasks (opt-in) —
SHOW TASKSplusTASK_HISTORYfor execution outcomes. - Stored procedures and UDFs —
SHOW PROCEDURES/SHOW USER FUNCTIONSplusGET_DDLfor SQL, JavaScript, Python, Java, and Scala languages (automatic when the role hasUSAGEon them). - Table-level lineage (opt-in) — via
SNOWFLAKE.CORE.GET_LINEAGEon Enterprise+ editions.
Metadata vs. data access. The baseline grants below give Coalesce Quality access to your schema and DDL, never to row data. The
SELECT privileges on tables/views/etc. are required so the role can call SHOW and GET_DDL (Snowflake gates object visibility behind any object privilege), but Coalesce Quality only issues data-reading queries when you enable the corresponding opt-in feature in the integration UI — Fetch table metrics, Fetch query logs, Fetch table lineage, or SQL test execution against the audit table. With every opt-in disabled, the integration runs metadata commands only.Before you execute your scripts you will need several key variables:
warehouse_name— the name of the warehouse you will create (e.g.SYNQ_WH)database_nameas an identifier of database (or multiple) you want to monitor
- It creates a dedicated
usernameandrolefor Coalesce Quality - It creates
xsmalldata warehouse that we can use to query your metadata - Grant necessary privileges to the dedicated user and role so we can pull query history and monitor the target database
Setup a user and warehouse
As a super user, execute the following SQL commands to create a read-only role, a user assigned to that role, and a warehouse for that role. We recommend creating a dedicated user name and warehouse.Password authentication
In the code, remember to replace:<user_password>with a password that meets your account’s password policy<warehouse_name>with the name you want the dedicated warehouse to have
Key-pair authentication
For more details on Snowflake’s key-pair authentication, see the official Snowflake documentation.
- Managed Key-pair: The key pair is generated and managed for you
- User Managed Key-pair: You generate and provide your own private key (supports both encrypted and unencrypted keys)
Option A: Managed Key-pair
When configuring the integration, select “Managed Key-pair” and a public key will be generated for you. Copy this public key and use it in the setup below. In the code, remember to replace:<rsa_public_key>with the key generated in the previous step<warehouse_name>with the name you want the dedicated warehouse to have
Option B: User Managed Key-pair
Both encrypted and unencrypted private keys in PKCS#8 PEM format are supported. If you use an encrypted key, you’ll need to provide the passphrase when configuring the integration.
Generate a new key pair
Snowflake requires a minimum 2048-bit RSA private key in PKCS#8 PEM format. Generate an unencrypted private key:Extract the public key
After generating your private key, extract the public key:Configure Snowflake with your public key
Remove the header and footer from the public key file (-----BEGIN PUBLIC KEY----- and -----END PUBLIC KEY-----), then use the remaining content as <rsa_public_key> in the setup script:
Configure the integration
In the integration settings:- Select “User Managed Key-pair” as the authentication method
- Paste your private key (including the
-----BEGIN PRIVATE KEY-----and-----END PRIVATE KEY-----headers) - If your key is encrypted (starts with
-----BEGIN ENCRYPTED PRIVATE KEY-----), provide the passphrase
Grant access to monitored database
We recommend setting access on Schema level, as long as it is aligned with your permissions management strategy.Option 1 (Recommended): Grant access to all schemas
The following stored procedure iterates through each schema in a given database, then grants access to each table in a given schema. This stored procedure should be run as follows each time a new schema is created. Run it in the same Worksheet as the Setup a user and warehouse step above so the$role_name session variable is still set.
Replace <database_name> with the name of your database.
MATERIALIZED VIEW, STREAM, and SELECT ON DYNAMIC TABLE grants are silently ignored on Snowflake editions that do not support those object types — the grant statements still succeed, so the procedure is safe to run on Standard edition.Semantic views need both
SELECT and REFERENCES. SELECT lets the role list them via SHOW SEMANTIC VIEWS and query them via SEMANTIC_VIEW(sv DIMENSIONS … METRICS …). REFERENCES is required separately so GET_DDL('SEMANTIC_VIEW', …) returns the body — without it, the catalog scrape can see the asset but cannot read its definition. Snowflake gates this differently from every other object kind, where SELECT / USAGE cover both visibility and GET_DDL.Option 2: Grant access to a database
Run this in the same Worksheet as the Setup a user and warehouse step above. Replace<database_name> with the name of your database.
Grant access to Snowflake tasks (Optional)
If you want to monitor Snowflake tasks, you need to grant MONITOR privileges on the specific tasks you want to observe. This allows us to collect task execution history and metadata. Replace<database_name>, <schema_name>, and <task_name> with your actual database, schema, and task names before running:
The MONITOR privilege on tasks allows viewing task execution history, status, and metadata but does not allow executing or modifying the tasks. This is required for task monitoring and anomaly detection.After granting these privileges, you must also enable task monitoring in the integration settings. In the integration configuration screen, make sure to enable “Fetch tasks and their executions” to start collecting task data.
Grant access to Snowflake tags (Optional)
If your Snowflake objects use tags and you want Coalesce Quality to read them (e.g. to filter tables or deploy monitors based on tag values), you need to grant theAPPLY TAG privilege. Without this privilege, Snowflake’s GET_DDL function replaces tag names and values with #UNKNOWN_TAG='#UNKNOWN_VALUE' placeholders.
This grant is only needed if you use Snowflake tags on your tables/views and want Coalesce Quality to use them for filtering or monitor rules. Coalesce Quality will show a warning during ingestion if it detects unknown tag placeholders in your metadata, so you can decide at that point whether to apply this grant.The
APPLY TAG privilege allows reading tag assignments but does not grant the ability to modify data or other security policies. See the Snowflake GET_DDL documentation for more details.Stored procedures and user-defined functions
Coalesce Quality automatically discovers stored procedures and UDFs usingSHOW PROCEDURES IN DATABASE / SHOW USER FUNCTIONS IN DATABASE and fetches each object’s DDL via GET_DDL. All languages are supported (SQL, JavaScript, Python, Java, Scala). The grants in Option 1 / Option 2 above already include the required USAGE on procedures and functions — no extra steps are needed.
Procedures and UDFs show up as first-class assets in Coalesce Quality and participate in lineage whenever they are referenced by tables, views, or tasks.
Personal access (user OAuth)
In addition to the workspace credentials above, you can let each Coalesce Quality member authenticate as themselves against Snowflake. Queries then run under the member’s own Snowflake account and respect the grants, masking policies, and row-level security configured on that user. See Data Warehouse Access for the full model and when to enable it. To enable personal access, an account admin creates a Snowflake security integration of typeOAUTH once, then pastes the client ID and secret into the Snowflake integration’s edit page in Coalesce Quality.
Create the security integration
https://app.synq.io, the US app is https://app.us.synq.io — pass one as OAUTH_REDIRECT_URI and the other (if applicable) in OAUTH_ALTERNATE_REDIRECT_URIS. No trailing slash.
BLOCKED_ROLES_LIST prevents members from minting OAuth tokens for high-privilege account roles. Add any other roles your security policy reserves for break-glass use.
Fetch the client credentials
OAUTH_CLIENT_ID, OAUTH_CLIENT_SECRET, and OAUTH_CLIENT_SECRET_2 (the second secret exists for rotation; either can be used). Paste the client ID and one of the secrets into Settings → Integrations → (your Snowflake integration) → Warehouse access → Personal credentials in Coalesce Quality.
No user mapping is required. When a member consents, they sign in to Snowflake on the standard authorize page, and the access token is issued for that Snowflake user. If your account uses SSO/SAML, the consent page transparently redirects through the IdP. Coalesce Quality stores per-user access/refresh tokens; queries from that member then run as the Snowflake user they signed in as.
Optional: restrict which roles members can request
Each member can pass arole parameter when consenting (Coalesce Quality forwards it as scope=session:role:<role>). If you want to constrain the set of roles reachable through this OAuth app, use ALLOWED_ROLES_LIST:
ALLOWED_ROLES_LIST is a whitelist that complements BLOCKED_ROLES_LIST (blacklist) above. Leave it empty to allow any role the member is granted on Snowflake, minus the blocked ones.
Network Configuration
If your Snowflake instance is behind a firewall or has network access controls, you may need to whitelist our IP addresses. See IP Whitelist for the complete list of IP addresses by region.
Input data in the UI
Integration name
For example,snowflake
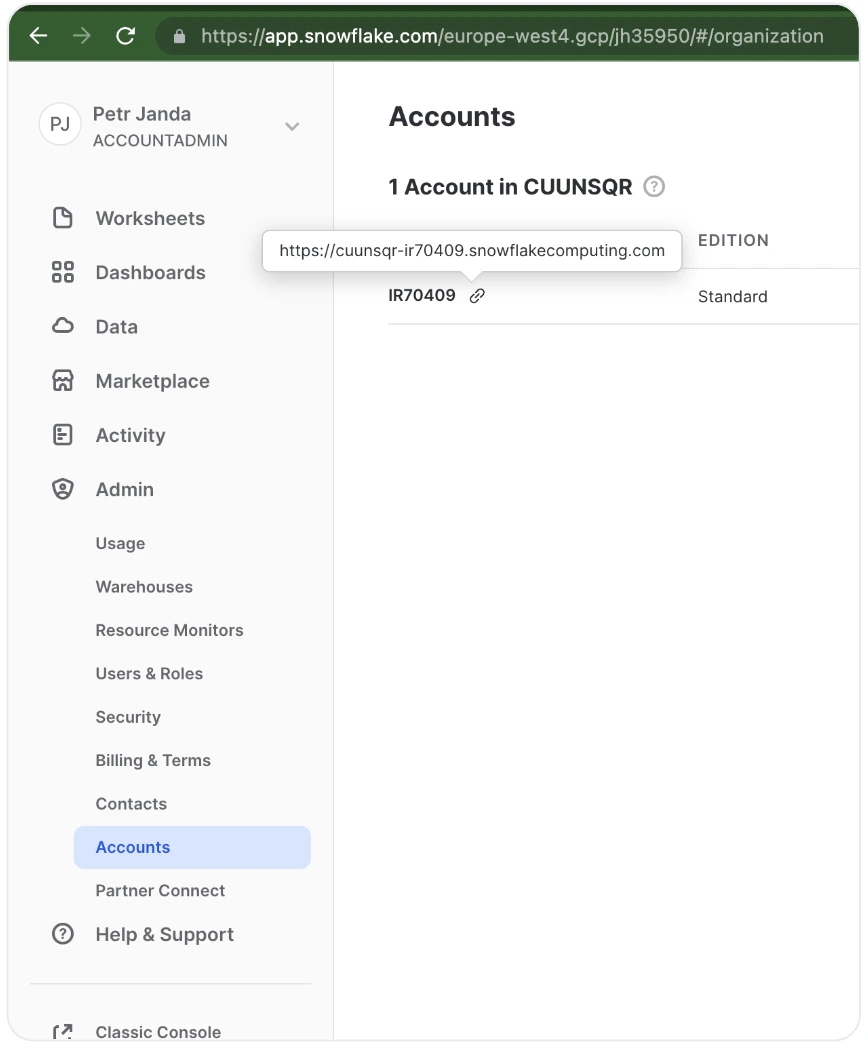
Account name
You can find it underAdmin > Accounts when you highlight the link icon (🔗). Both formats work:
<orgname>-<accountname>(preferred, e.g.acme-prod1)<locator>.<region>(legacy, e.g.xy12345.eu-west-1)
https:// or a trailing slash. A trailing .snowflakecomputing.com is stripped and the value is lowercased automatically, so either acme-prod1 or acme-prod1.snowflakecomputing.com will work.
Databases
The names of the databases you granted access to earlier in the guide. You can monitor multiple databases with the same integration.Role, username, and password
The role name, username, and password you created earlier in the guide.Warehouse
The name of the warehouse you created earlier in the guide.Audit table FQN (optional)
Fully-qualified table name (e.g.MY_DB.PUBLIC.SYNQ_AUDIT) where Coalesce Quality will write SQL test execution results. The integration creates the table automatically if it does not yet exist. Leave empty if you do not run SQL tests.
ACCOUNT_USAGE database name (optional)
Defaults toSNOWFLAKE. Override only if your account has the SNOWFLAKE share imported under a non-default name.
Optional flags
- Fetch query logs — enables query history ingestion from
SNOWFLAKE.ACCOUNT_USAGE.QUERY_HISTORY. You can optionally restrict the set of source databases. - Fetch Snowflake tasks — discovers Snowflake Tasks (
SHOW TASKS). Select a subset of databases or leave empty for all. - Fetch task executions from
ACCOUNT_USAGE.TASK_HISTORY— when on, centralized task history is used (up to 45-minute lag). When off,INFORMATION_SCHEMA.TASK_HISTORYis queried per database (lower lag, more warehouse time). - Task execution fetch interval (minutes) — minimum 5.
- Fetch table lineage — uses
SNOWFLAKE.CORE.GET_LINEAGEfor table-level lineage (Enterprise+). Optionally restrict to a subset of databases. - Don’t use GET_DDL for table schema collection — enable only if
GET_DDLcauses warehouse pressure; Coalesce Quality will fall back to parsing query logs.