This guide details the steps to integrate SYNQ with Databricks using the Unity Catalog feature. This integration enables efficient data observability and management across your Databricks environment.Before proceeding, ensure you have:
- Administrative access to your Databricks workspace
- Permissions to manage Unity Catalog settings
Integration Overview
Integrating SYNQ with Databricks through Unity Catalog allows you to leverage SYNQ’s capabilities to monitor and manage data reliability and quality directly within your Databricks environment.Prerequisites
- Databricks Workspace URL: The URL of your Databricks workspace where Unity Catalog is configured.
- OAuth Client ID and Client Secret / Access Token: A Databricks credentials with permissions to access to monitored catalogs.
- Warehouse ID: The identifier for the SQL warehouse within Databricks which SYNQ will use to run monitoring queries. We recommend using Serverless SQL Warehouses.
Step-by-Step Guide
Step 1: Configuring Unity Catalog
- Log in to your Databricks workspace: Navigate to your Databricks workspace by entering the Workspace URL in your browser.
- Access the Unity Catalog: From the sidebar, select ‘Data’ and then ‘Unity Catalog’ to configure the data catalog settings.
- Create or Select a Catalog: Choose an existing catalog or create a new one where SYNQ will operate.
Step 2: Create authentication method
Option 1: Using Service Principal and OAuth (recommended)
- Create Service Principal: Navigate to the ‘Admin Console’ and select ‘Identity and access’ > ‘Service Principals’ > ‘Manage’. Click on ‘Add Service Principal’ > ‘Add new’ and provide the name of the service principal. Note the generated Service Principal ID.
- Generate OAuth Secret: Click on the created Service Principal, go to the Secrets tab and click on ‘Generate secret’. Note the generated OAuth token securely.
- Assign Permissions: Assign the necessary permissions to the Service Principal to access the Unity Catalog and other required resources.
Option 2: Using Personal Access Token (not recommended)
- Navigate to the User Settings: Click on your profile at the bottom left corner and select ‘User Settings’.
- Access Tokens: Go to the ‘Access Tokens’ tab and click on ‘Generate New Token’. Enter a description, set the expiration according to your policy, and note the generated token securely.
Step 3: Configure SYNQ Integration
- Login to SYNQ: Access your SYNQ dashboard.
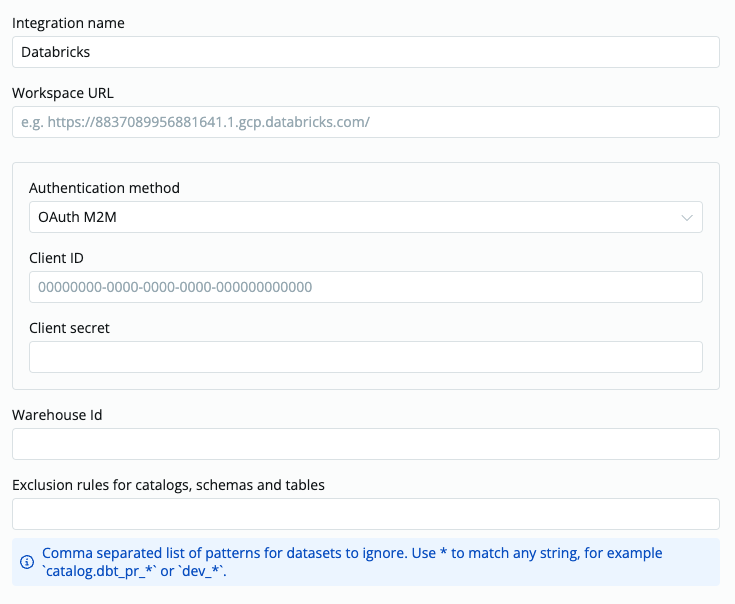
- Add Databricks as an Integration: Navigate to ‘Data Sources’, select ‘Add integration’, and choose ‘Databricks’.
- Enter Integration Details: Provide the Workspace URL, Access Token, and Warehouse ID to establish the connection.
- Network Configuration: If your Databricks workspace has network access controls or firewall restrictions, you may need to whitelist SYNQ’s IP addresses. See SYNQ IP Whitelist for the complete list of IP addresses by region.
- Set Exclusion Rules: Define any exclusion rules for catalogs, schemas, and tables to tailor the monitoring to your needs.

